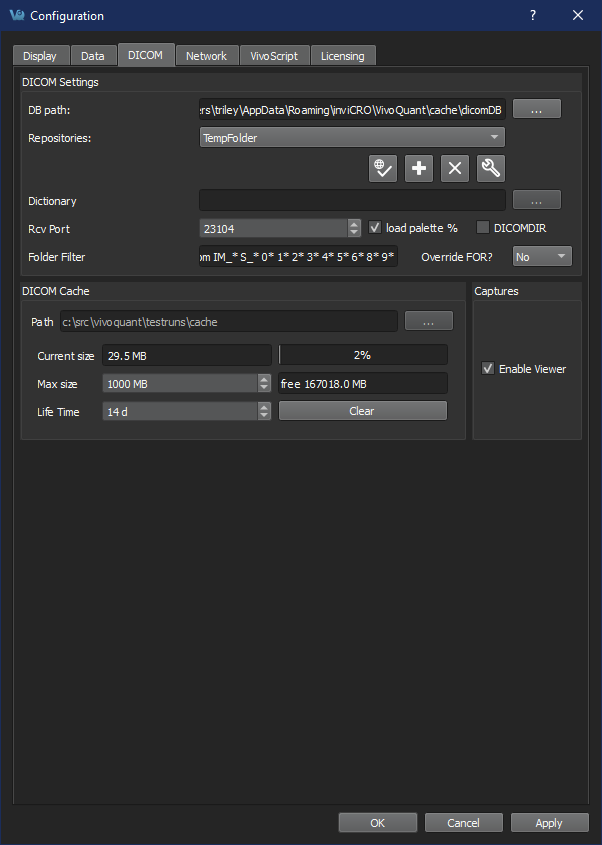
The DICOM configuration allows the user to add/edit DICOM repositories. These repositories can be local folders containing DICOM files, or DICOM network servers located whether on a local or a remote computer. The DICOM Dump uses the DICOM Dictionary to identify information in the DICOM header. Check the How-To guide for more information on configuring the NanoSPECT’s DICOM Servers in VivoQuant.

Getting There

The DICOM Repository can be accessed in three different ways.

Ddex is accessible via the Repository panel in the Data Browser. To open the Data Browser, click the Data Browser icon.

Repository Panel
Repository Panel

The second method is by selecting the Configuration option in the Tools menu, and then click on the DICOM panel.

Configuration Option

The third method is by opening the Configuration panel using the “Ctrl+Shift+C” shortcut. For more information on keyboard shortcuts in VQ, please see Keyboard Shortcuts.

Configuration Dialog

The DICOM panel in the Configuration dialog box provides the most in-depth DICOM information available in VivoQuant. The DICOM panel consists of three sections: DICOM Settings, DICOM Cache, and Captures.

DICOM Settings

DICOM Settings
DICOM Settings
Option Description
DB path Location of local DICOM database. Allows optimized internal access to the Mediso DICOM database. See Optimized local access, for details.
Repositories List of available repositories. The bank of buttons immediately beneath the pulldown menu operate on the selected repository in this field:
Test Repository Settings Checks connection to DICOM repository. Local folders are verified to exist and a C-ECHO is sent to DICOM servers.
Add Repository Adds a new repository
Delete Repository Deletes selected repository
Edit Repository Opens the DICOM Editor DICOM Editor
Dictionary Shows list of additional dictionaries used by the DICOM library. Please set environment variable DCMDICTPATH to set this value. For more information on the DICOM dictionary, see DICOM Dump
Rcv Port Port over which the DICOM peer sends data.
load palette % If enabled, the palette window will be loaded in accordance with the image data. If disabled, the palette window will be set to whatever the window was set to last.
DICOMDIR Checking this box enables support for DICOMDIR files.
Folder Filter Allows users to specify the type of DICOM files loaded into VivoQuant. Users can configure loading extensionless dicom data by adding a space and * to the end of the default settings: Folder Filter
Override FOR A Frame of Reference (FOR) is a coordinate system that ensures the spatial relationship of images within a series. It also allows for images across multiple series to share the same FOR. VivoQuant allows users to choose among different behaviors regarding this setting.
Yes: the system will always overwrite the FOR settings and apply co-registration when loading a DICOM series of images.
No: the system will never overwrite the FOR settings of the DICOM image series and will always apply co-registration.
Ignore: the system will neither overwrite the FOR settings nor apply co-registration.
Ask: the system will provide the user with the option of choosing one of the previous options when loading a DICOM image series.

DICOM Cache

The DICOM cache allows for the storage of frequently used data sets locally, thus improving load time into VivoQuant. Every time VivoQuant is started, it checks the current size of the cache against the maximum cache size. If the current cache size exceeds the maximum cache size, then older files (those opened least recently) are removed.

DICOM Cache
DICOM Cache
Option Description
Current Size Size in Mb of the data currently stored in the DICOM Cache. The percentage to the right of the field indicates how close the cache is to capacity.
Max size Maximum amount of memory that can be made available for the DICOM Cache (default = 1000.0 MB).
Life Time Length of time over which data will be stored in the DICOM Cache (default = 14 days).
Clear Empties the DICOM Cache.

Captures

Captures
Captures

Data Browser Repository Panel

The DICOM Repository panel, in the Data Browser, is the most convenient location for adding and editing repositories, including DICOM Servers, local folders, and PACS Servers.

Repository Panel
Repository Panel
Option Description
Repositories List of available repositories. The bank of buttons immediately beneath the pulldown menu operate on the selected repository in this field. Please click here to learn more about the DICOM repository section of the DICOM browser:
Test Repository Settings Checks connection to DICOM repository. Local folders are verified to exist and a C-ECHO is sent to DICOM servers.
Add Repository Adds a new repository.
Delete Repository Edit: Opens the DICOM Editor.
Open Folder Opens a Windows Browser that can be used to select a local folder as a repository.
Fetch Metadata Fetches all DICOM meta data.
Remove Repository Removes repository from list.

DICOM Editor

The DICOM Editor is used to add repositories, including local folders, DICOM Servers, or iPACS Servers.

Local Folder
Local Folder
DICOM Server
DICOM Server
iPACS Server
iPACS Server
Option Description
Displayed Name Name as shown in the repository selection box. Can contain any alphanumeric character.
Repository Type Indicates the type of repository containing the study data to be loaded into VivoQuant.
  Local folders are directories available on the local computer (also via a shared network). Directories containing many files might take longer to scan. In this case, a DICOM server will perform better.
  DICOM servers are network services on the local or a remote computer. They provide a database to efficiently browse study data.
  An iPACS server is an online PACS servers, a regularly used archiving and retrieval system for medical images.
Local DICOM folder Allows for browsing and selecting a local directory. All sub-folders will be displayed as projects in the second repository drop-down window.
DICOM server AET is an Application Entity Title.
  Calling AET: must be a valid AET configured on the server.
  Called AET: name of the DICOM servers application entity.
iPACS server Username and Password are specific to the user of the site’s iPACS system.
  Hostname is the site of the server for the iPACS, and Port is the communication channel.

DICOM server

A DICOM server is specified by a calling AET, a Called AET, as well as a TCP address consisting of a host name and a port (the default settings are localhost:104). The AETs must be configured on the DICOM server. For VivoQuant, use port 23104 on the remote server.

iPACS server

An iPACS server is specified by setting the appropriate Hostname and Port and by entering user-specific Username and Password. A DEMO iPACS server may be registered by using Hostname: demo.ipacs.invicro.com, Port 80, and leaving Username and Password blank. iPACS servers also enable the use of Projects, a useful tool for organizing DICOM data.

Optimized local access

The optimized local access allows for a much faster access to DICOM data. To use this option enter ‘localhost’ (all lower case) as the hostname, and define the ‘DB path’.

iPACS Projects

The iPACS repositories allow for the use of projects. A project represents a directory structure for DICOM repositories. Data may be stored and accessed via different projects, aiding organization of DICOM data. In the example below, an iPACS repository for “bioscan/demo” is being configured. The “bioscan/demo” repository contains three projects.

iPACS Repository
iPACS Repository

If any projects are present within a configured iPACS repository, a second pulldown menu will appear in the Repository panel of the DICOM browser. All projects within that repository are available via the second pulldown menu. The three projects associated with the “bioscan/demo” repository are shown in the screenshot below.

Repository Projects
Repository Projects

Select a project to view data associated with that project only.

Select Project
Select Project

By default, data will only be displayed when the project to which it belongs is selected from the second pulldown menu. For example, in this screenshot, no data appears in the “bioscan/demo” repository because all data within the larger repository belongs to individual projects.

Larger Repository
Larger Repository

To simultaneously view all data belonging to a repository AND its projects, place an asterisk (*) at the end of the hostname during repository configuration. The asterisk will cause all data within the repository and its projects to be displayed recursively. This behavior applies across all repository and project levels.

Repository Data Display

How to configure the NanoSPECT’s DICOM Servers

First, open the Data Browser. Find the Repository panel and either select the pre-existing repository from the pulldown menu or select “new” to create a new repository.

For the standard access on the NS Workstation (WS), use:

Workstation DICOM Server
Option Description
Displayed Name NSxxWS_DCMSRV (or customer’s preference)
Type DICOM Server
AET INVIVOSCOPE
Called AET NSxxWS_DCMSRV
Hostname localhost
Port 104

where xx is replaced with the NanoSPECT number, typically no leading 0 for numbers \< 10.

The local access VivoQuant is able to access the DICOM Server directly, so there is no need to add the VQ as a client on the DICOM Server.

The above table described configuring VivoQuant to access the Workstation DICOM Server. VivoQuant may also be configured to access the Acquisition computer’s DICOM Server. The procedure is similar, but there is no WS in the naming convention.

Acquisition computer's DICOM Server
Options Description
Displayed Name ACQ_NSxx_DCMSRV (or customer’s preference)
Type DICOM Server
Calling AET INVIVOSCOPE
Called AET NSxx_DCMSRV
Hostname nanospectxx
Port 104

where xx is replaced with the NanoSPECT number, typically no leading 0 for numbers \< 10.

In place of hostname (i.e., nanospectxx), it is also possible to use IP addresses (i.e., 192.168.1.1 for local WS-ACQ computer connections). Please verify that the hostname resolves by using ping hostname in a Command window. Also, in order to access the ACQ computer from the WS computer, you must configure the DICOM Server on the ACQ computer.