Several appearance features may be customized in the Display panel, including General display information, Maximum Intensity Projection attributes, and Color Palette defaults.
Tip: You can use the Apply button to quickly preview many of the UI related changes quickly before you OK them.
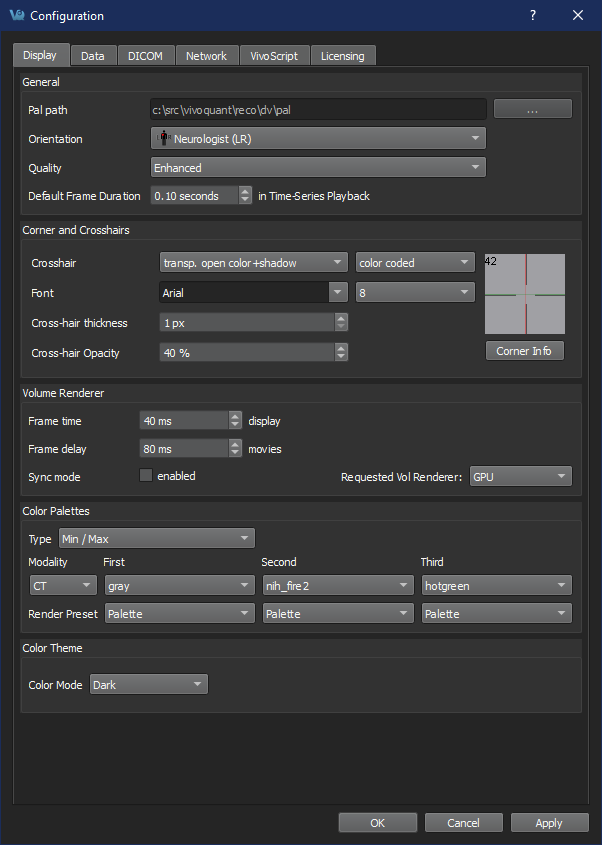
General
| Option | Description |
|---|---|
| Pal Path | Pal files hold the color map information for the different Color Palettes available in VivoQuant. |
| Orientation | Provides an option to view the data whether in Radiologist View (face to face) or Neurologist View (mirror). Diagrams are used to show the difference. |
| Quality | Provides an option to view the data whether in Native or Enhanced quality. With Native quality, voxels are always displayed as they are defined in the image, with no smoothing applied. With Enhanced quality, smoothing is applied to the image when a voxel is displayed using multiple pixels on the screen. There is no effect on quantification. |
| Default Frame Duration | Establish a default value for the ‘Frame Duration’ parameter in the Time Series operator. |
Corner and Crosshairs
| Option | Description |
|---|---|
| Crosshair style | Sets the visual style of the crosshair to be used in the Main Window. |
| Crosshair color | Sets the colors of the crosshair to be used in the Main Window. Crosshair color options include red, yellow, magenta, white, green, and blue. |
| Font Style | Controls the font style of the displayed text in the Main Window. |
| Font Size | Controls the size of the text displayed in the Main Window |
| Crosshair thickness | Controls the pixel width of the crosshair lines |
| Crosshair Opacity | Controls the opacity of the crosshair lines |
| Preview Panel | Displays a preview of the font and cross-hair selections. |
| Corner Info | Launches the Corner View Information dialog which controls the information to be displayed on each corner of the slice views. |
Volume Renderer
| Option | Description |
|---|---|
| Frame Time - Display | Sets the display duration for each MIP projection image during MIP Controller playback. |
| Frame Delay - Movie | Sets the delay time between MIP frames in a saved movie. |
| Sync mode | If enabled, only completed MIP frames will be displayed. If disabled, the MIP will freely rotate at all times but will display a message in place of the MIP for uncompleted frames. |
| Requested Vol Rendered | Sets the MIP image volume rendering unit. Options are: Smart, CPU and GPU. |
Color Palettes
| Option | Description |
|---|---|
| Type | Sets the method for determining the color palette range. |
| Palette | The default Color Palettes for the first three loaded volumes of each Modality are set. Inputs beyond the third loaded volume of a particular modality follow the palette of the third one. |
Color Theme
| Option | Description |
|---|---|
| Color Mode | Changes the general appearance of VivoQuant’s menus, buttons and windows: - Default (use the native appearance of the Operating System) - Dark - Light |
Note: On MacOS only, the Default option is replaced by the System option which will follow the Dark/Light system’s configuration from System Preferences -> General -> Appearance. It is not yet supported on other Operating Systems.