The Distance/Annotation operator enables you to measure the distance between two points in any image. For example, it can be used to measure the size of a tumor by measuring its length, depth and width. One of the most powerful options available with the distance measure is the capability to perform landmark co-registration.
Getting There
The Distance/Annotation operator can be accessed via the operator pull-down menu on VivoQuant’s front panel.
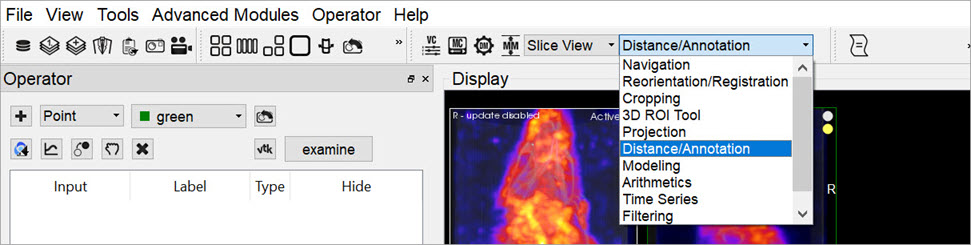
Using the Operator
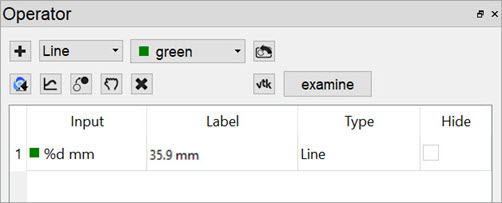
Upon selecting the operator, theDistance/Annotation operator is displayed. The physical distance between two points can be measured by clicking on the Add New icon  to add an object. To measure distance, left-click on two points of the image. A line is displayed between the two points to show what is being measured.
In the Distance/Annotation operator, each line is identified by a unique color tag. For each line, the 3D start and end points of the line are displayed as well as the length of the line (in mm). Multiple distances can be measured on the same image and are easily distinguished by their unique color. The results can be saved into an Excel file by clicking Save. The Profile function enables a graphic plot of the distance to be displayed for both the reference and the input data.
Goto with-in the object
Since a single left click sets a new point, you have to use a single middle mouse button click to go to the given position in the two respective other slices.
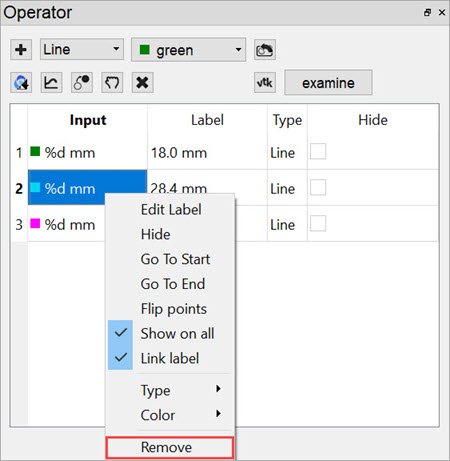
Removing Distance Measures
Right-click on any of the distance measures and click Remove to delete the distance measure completely.
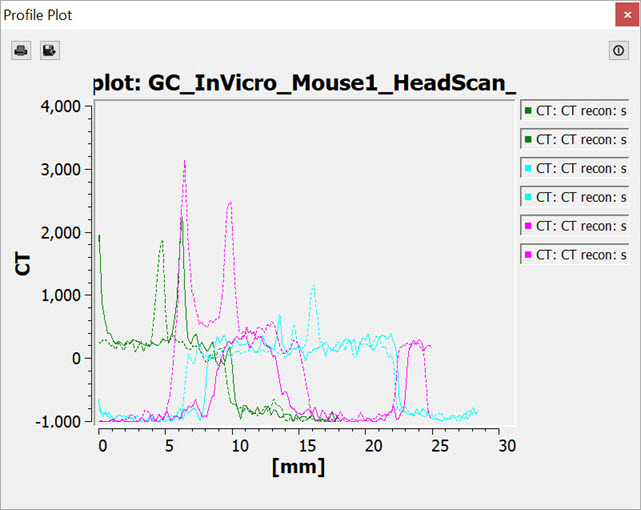
Profile
The Profile operator plots the values in each voxel through which the line passes. Values are displayed for both Reference and Input data sets and, given proper calibration, the plot values will be in Houndsfield units and MBq for CT and NM data sets, respectively. The File menu provides an option to save the Profile data as a PDF.
Landmark Circle Detection
This feature is triggered via the Landmark Circle Detection icon ![]() . Landmark Circle Detection is basically a way to find circles in the image slices that can be used as anchor points for image registration, and is effectively used by Reorientation / Registration via the Landmark tab option.
. Landmark Circle Detection is basically a way to find circles in the image slices that can be used as anchor points for image registration, and is effectively used by Reorientation / Registration via the Landmark tab option.
Landmark circle detection employs an algorithm known as Hough Circle Detection. This algorithm works best if you first create circle annotations around the circles in one slice of the image; this helps the algorithm by seeding it. The more circle annotations the better the registration will be. When you click the button the algorithm will use your annotations as known circles and will try to interpolate and detect the same circle in all other image slices, populating new annotation shapes into the list for each. Without any supplied annotation circles the Hough settings dialog will appear and allow to you to tailor the algorithm for automatic circle detection.