Overview
ROI stands for Region of Interest and is used to describe a particular area or volume within an image for which the user wishes to characterize some quantity or quality. The 3D ROI operator provides advanced tools for drawing, visualizing, saving, and quantifying both 2 and 3 dimensional regions. This operator allows for having a voxel belonging to more than one ROI. For example, a user could have an ROI that contains the whole brain and other ROIs for regions of the brain, meaning that each voxel of the whole brain ROI would need to simultaneously be part of two different ROIs.
VivoQuant supports overlapping of ROIs by adding layers. The user is able to add new layers in the 3D ROI Operator, select an active layer, and create and modify ROIs in that layer independent of the contents of other layers. Overlapping is then possible as each voxel can belong to various ROIs on each layer.
The previous ROIs approach limited the user to 256 ROIs, as it used an internal buffer of unsigned chars (1 byte per voxel). To allow for multiple layers, the new approach keeps a list of buffers of unsigned chars that can be increased on demand by the user up to a potential of 8 layers if the RAM allows it. The new maximum total number of ROIs was then increased to 2048, and each voxel now supports up to 8 overlapping ROIs. However, the allocated RAM for the ROIs object increases significantly as the user adds more layers. We can also expect a small overhead execution cost when drawing the ROIs on the image for display purposes, as the blending or the handling of the different layer will require more processing.
Getting There
The 3D ROI operator can be accessed via the operators pull-down menu on the VivoQuant front panel.
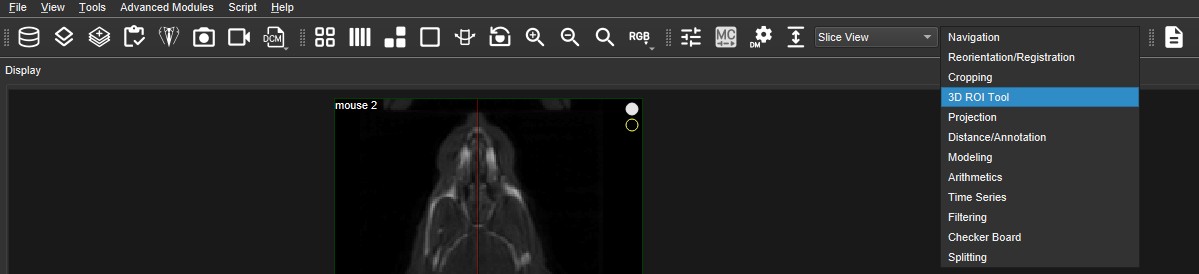
When the 3D ROI operator is selected, a 3D ROI operator operator window is displayed.
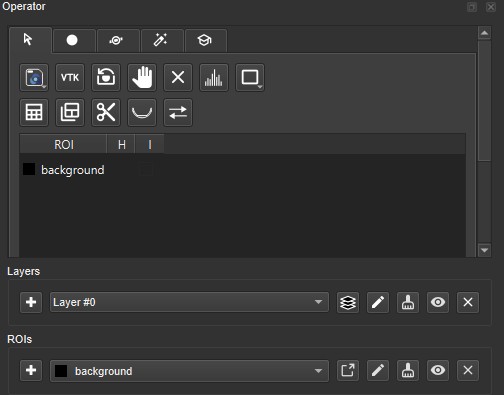
Layers
We use ROIs to label voxels in the image as belonging to a region, so we can extract quantitative information about that region from the image. Layers allow the user to specify that a particular voxel belongs to multiple regions. Within a layer, a given voxel can only belong to one region; that is, ROIs are associated with a layer. For example, one layer could contain different brain sections, while another layer defines the entire brain.
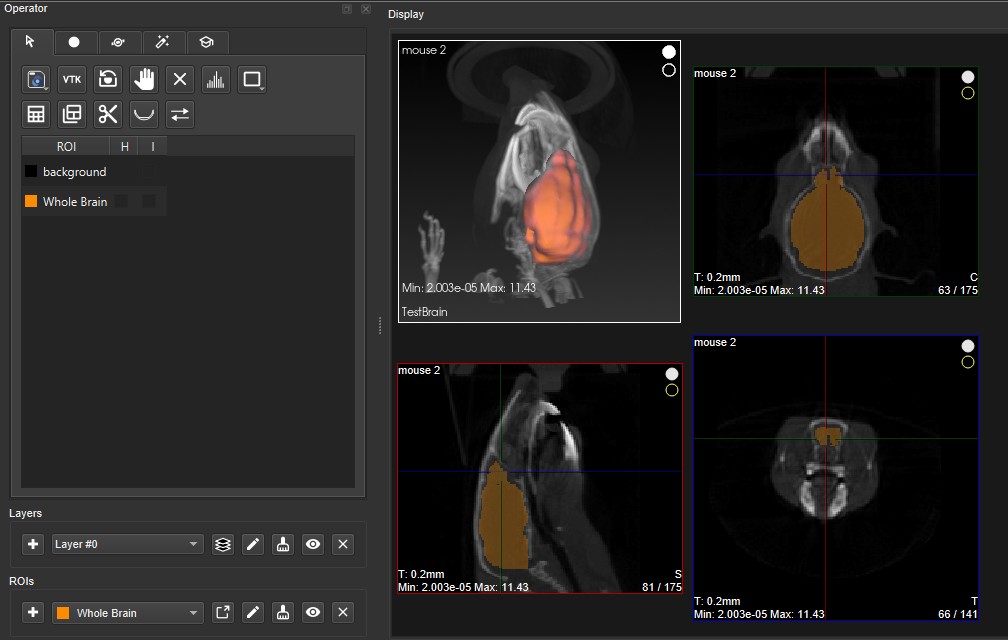
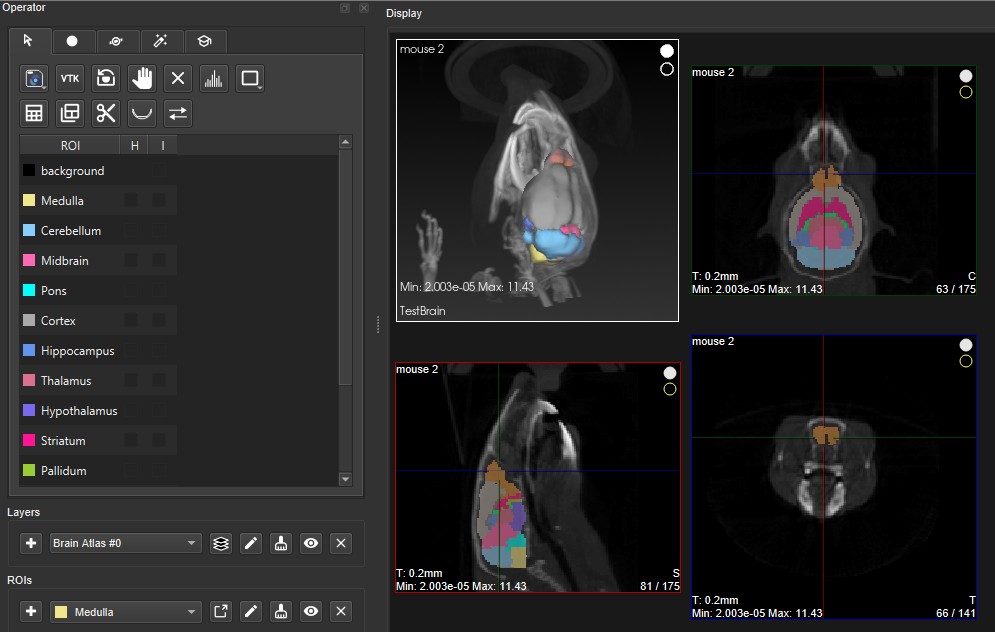
Layers can be created and deleted from the strip of icons at the bottom of the 3D ROI Operator.

| Icon | Description |
|---|---|
 |
Add a Layer |
 |
Dynamic Layers |
 |
Launch the edit layer dialog |
 |
Toggle layer visibility |
 |
Clear the layer contents |
 |
Delete a Layer |
Add a Layer
Click the Add Layer button to create a new layer.
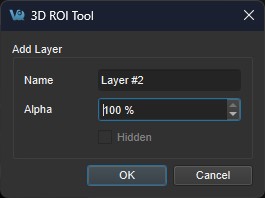
A popup window will open, prompting the user to name the new layer and set the transparency of the ROIs by selecting an alpha value.
- Decrease the alpha value to increase the transparency of all ROIs in the layer.
- Values range from 0% - 100% and change by 10% increments.
- The option to make the layer hidden is not available during the layer creation process and appears greyed-out.
Select Active Layer
Select the layer of interest from the dropdown Layer to set it as the Active Layer. The display will show the active layer, and any layer actions, such as editing or deleting, will be performed on the current active layer.
Delete a Layer
Click the Delete Layer button to open options for the active layer.
A popup window will open, prompting the user to delete or reassign the ROIs associated with the specified layer.
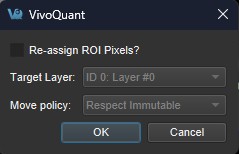
- To delete all ROIs in the layer, click OK.
- To reassign the ROIs to another layer, click the Re-assign ROI Pixels check box and the greyed-out options underneath will become active.
Verify that the layer selected in Target Layer is the layer of interest then select the Move Policy to apply.
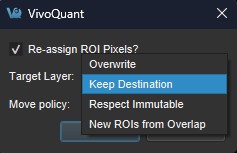
Available Move Policies are described in the table below.
| Move Policy | Description |
|---|---|
| Overwrite | ROIs from the layer being deleted (active layer) will trump any overlapping ROIs existing on the destination layer. Use this option if you do not want any of the ROIs being moved to be changed. |
| Keep Destination | ROIs on the destination layer will trump any overlapping ROIs existing on the layer being deleted (active layer). Use this option if you do not want the ROIs in the destination layer to be changed. |
| Respect Immutable (default) | Use this option if the user wants ROIs from both the destination layer and layer being deleted (active layer) to be preserved or overwritten based on pre-specified information. ROIs marked immutable from the destination layer will trump any overlapping ROIs. ROIs not marked immutable from the destination layer will be trumped by the ROIs from the source layer if overlapping. |
| New ROIs from Overlap | Using this option will create new ROIs in areas where the destination ROIs and the ROIs being moved overlap. Use this option if you want the flexibility to decide how the overlap is handled. |
Individual ROIs
ROIs can be created and deleted from the strip of icons at the bottom of the 3D ROI Operator.

| Icon | Description |
|---|---|
|
Add an ROI |
 |
Export an ROI |
|
Edit an ROI |
|
Delete an ROI |
|
Reset an ROI |
|
Hide an ROI |
Add an ROI
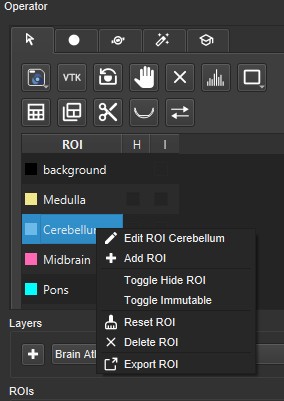
Click the Add ROI button to open options for adding a new ROI, or right click anywhere in the ROI table to add an ROi via the context menu. A popup window will open, prompting the user to provide specific information for the new ROI.
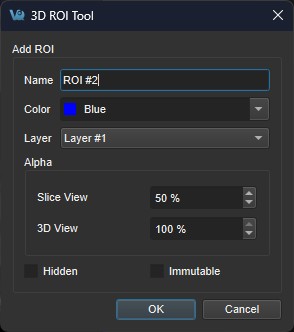
- The ROI’s name and color.
- The layer to which the ROI should be added
- The transparency of the ROI in the slice and MIP views. To alter the transparency, increase or decrease the alpha values (a lower percentage will increase the transparency of an ROI).
- The ROI’s visibility by checking “Hidden” to turn the ROI off in all views.
- The ROI’s ability to be edited by selecting “Immutable.”
Export an ROI
This will export the ROI as a DICOM into the Data Manager.
Edit an ROI
To edit an ROI, double-click the ROI to be edited to select it and click on the Edit ROI button. A popup window will open and allow the user to change the name, color, transparency (Alpha), visibility, and state of immutability of the ROI. To make ROIs immutable, check the boxes in the ‘I’ column.
Another option is to right-click on any ROI in the operator and select Edit ROI.
Delete an ROI
To delete an ROI, double-click the ROI to be deleted to select it and click on the Delete ROI button. A popup window will open and allow the user to move the pixels of the selected ROI to either the background or another ROI.
Another option is to select one or many of the existing ROIs, right click, and select Delete ROI.
Reset an ROI
To reset an ROI, double-click the ROI to be reset to select it and click on the Reset ROI button. A popup window will open and allow the user to move the pixels of the selected ROI to either the background or another ROI.
Another option is to select one or many of the existing ROIs, right click, and select Reset ROI.
Hide an ROI
There are 3 ways to hide an ROI in the slice and MIP views without deleting it.
- Toggle the
Hcolumn in the ROI table - Double-click the ROI to make it the active ROI and click on the Hide ROI button.
- Use the right-click context menu to toggle visibility
Another option is to select any one or all of the desired ROIs, right click, and select Toggle Hide ROI(s). All selected ROIs will become hidden.
Center view on ROI
To center the field of view on the center of mass of a particular ROI, double click the ROI in the ROI Table.
Operator Tab Organization
Each tab of the 3D ROI Operator window provides a grouped set of functionalities.
| Tab | Description |
|---|---|
 |
ROI General Tools |
 |
Painting Tools |
 |
Drawing Tools |
 |
3D Segmentation Tools |
 |
Expert Settings |
Main Tab
| Tab | Description |
|---|---|
 |
Import / Export |
 |
Trigger a refresh of the 3d View |
 |
Reset 3d camera position and orientation |
 |
|
|
Clear ROIs |
 |
Histogram |
 |
ROI & Layer View Modes |
 |
Quantification Table |
 |
Export Quantification Table |
 |
Cut the ROI |
 |
Export to Bed Removal |
 |
ROI Transfer Dialog |
Reset all ROIs
To reset all existing ROIs, click the button and select Reset All. Empty ROIs will still exist under the same naming and coloring scheme.
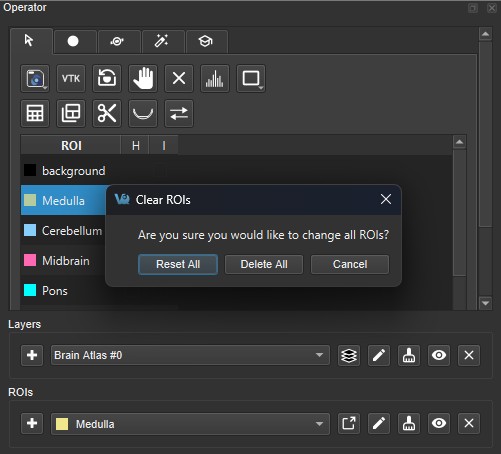
To delete all ROIs completely, click  and select Delete All. The background will be the only thing left in the ROI menu.
ROI and Layer View Modes
This button with launch a dialog to control the current rendering mode for ROIs. Here the user has the ability to render ROIs across layers or to specifically focus on the active ROI layer.
Image Cutting with ROI
To remove voxels from image data based on an ROI, choose the desired ROI from the ROI selector and click the Cut ROI button. All visible images will be cut and the ROI will remain unchanged. The cut tool is useful for eliminating undesired features in images, such as metal instrumentation that may appear in some CTs.
The user can choose whether to fill in the cut of the ROI with the image’s minimum value or maximum value in the Configuration > Data page
in the option ROI cut background.
Export ROIs to Bed Removal Tool
Click the Export to Bed Removal button to export ROIs into VivoQuant’s Advanced Bed Removal tool.
ROI Transfer Dialog
The ROI Transfer dialog allows you to copy or move ROIs between layers. Select the source ROIs from any layer in the left panel — the active layer is pre-selected on open — then choose one or more destination layers in the right panel. Use the Policy dropdown to control how conflicts are handled when ROIs overlap at the destination. The Static and Dynamic filter buttons in the destination panel let you quickly select all layers of a given type. Click Copy to duplicate the selected ROIs to each destination layer, or Move to relocate them. Both operations execute immediately and the dialog remains open, allowing you to perform multiple transfers in sequence. Right-clicking a layer in the source panel lets you set it as the active layer without closing the dialog.
Import Layers and ROIs with Overlapping Regions
Certain image formats, such as PMOD VOI and DICOM RTSTRUCT, support overlapping regions inherently. VivoQuant’s 3D ROI operator loaders handle the overlap appropriately.
Not only has the 3D ROI operator been updated to be compatible with overlapping ROIs, but numerous pre-existing features also successfully operate on the active layer supporting overlapping ROIs. These include: Segmentation Algorithms, Painting in the slice views, Tooltip Pixel hovers, Reorientation Operator, Modeling Operator, Multi-view Visibility, VTK MIP, AutoRAD, MAS, Brain Atlas and Smoothing Operator.
Painting Tools Tab
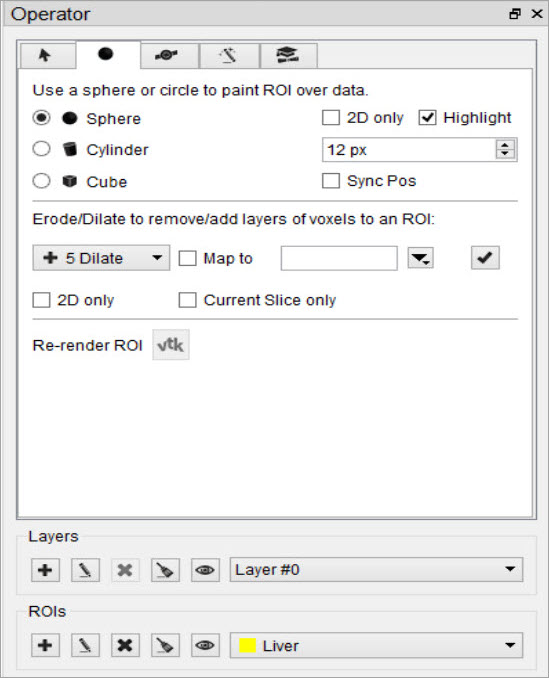
There are several paintbrushes to choose from when creating an ROI. The sphere  , cylinder
 , or
, or  cube paintbrush can be selected by clicking the corresponding radiobutton on the Painting tab
. The radius of the paintbrush can be set by changing the number of pixels shown in the numerical spin box. These 3D paintbrushes extend across multiple slices. To activate 2D mode, mark the ‘2D only’ checkbox. In 2D mode, the paintbrush will only paint on the current slice.
cube paintbrush can be selected by clicking the corresponding radiobutton on the Painting tab
. The radius of the paintbrush can be set by changing the number of pixels shown in the numerical spin box. These 3D paintbrushes extend across multiple slices. To activate 2D mode, mark the ‘2D only’ checkbox. In 2D mode, the paintbrush will only paint on the current slice.
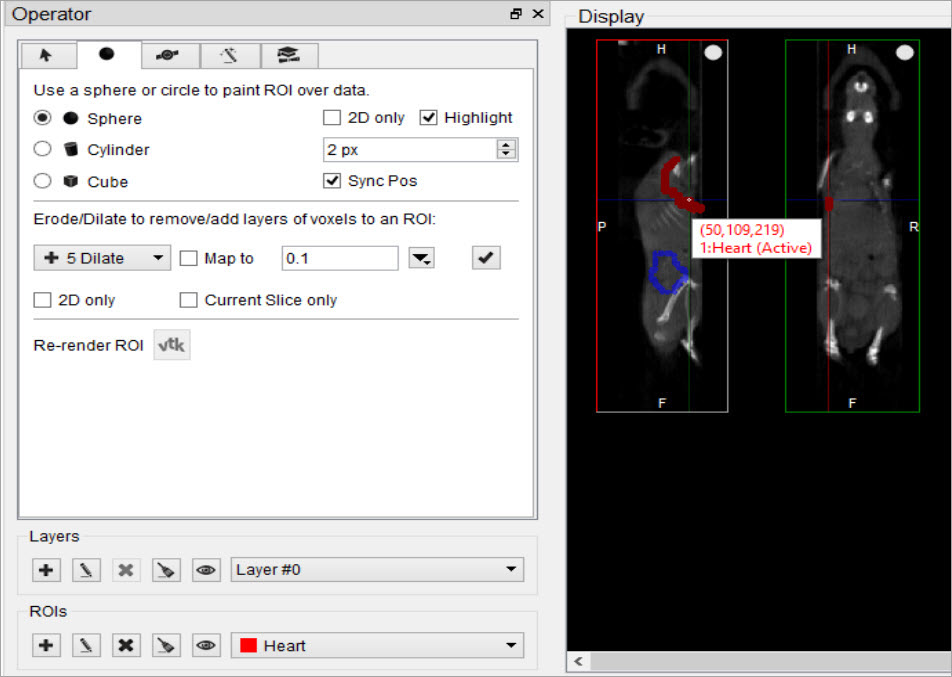
ROIs can be drawn freely on any of the three slice views. The view currently being drawn in will be denoted as Active in the upper left corner.
Each voxel can only belong to a single ROI. Painting over an existing ROI with a new ROI will place the painted voxels in the new ROI, unless the existing ROI is immutable. (See Edit an ROI to learn how to make an ROI immutable.)
To erase voxels from an existing ROI, paint over the existing ROI with the ROI selector set to Background. Alternatively, set the ROI selector to the existing ROI (from which to erase voxels) and hold down the Shift key while drawing. The Shift key activates the background ROI for the painting tool, even if another ROI is set in the ROI selector.
Sync Pos
If “Sync Pos” is checked, then the non-Active slice views will be updated in real time to match the position of the drawing tool on the Active slice. When this option is selected, drawing times will typically be slower.
Erode/Dilate
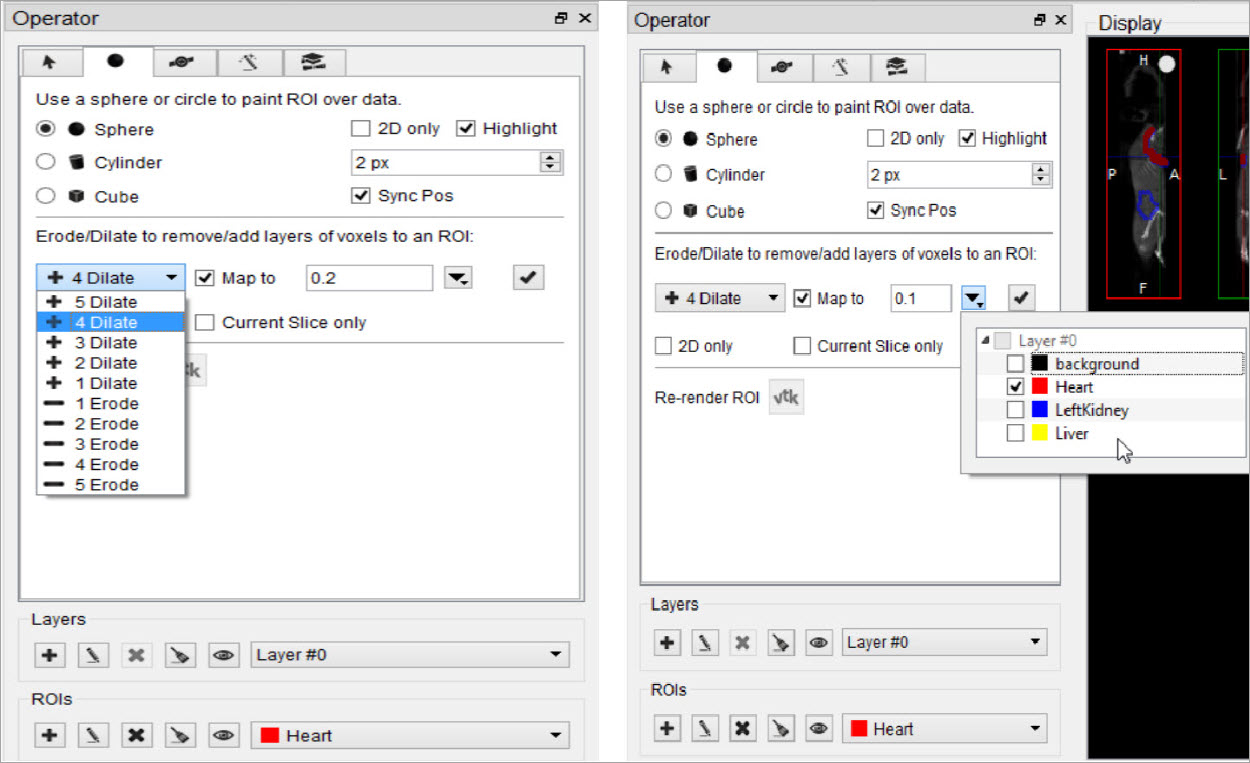
The Erode/Dilate tool allows users to modify the size of the input ROI by removing or adding up to 5 layers of voxels. Use Erode to shrink or contract the selected ROI, and Dilate to expand or enlarge it. These operations are applied to the currently selected ROI in the ROI selector.
If you would like the voxels that are being added or removed from the ROI to be put in an ROI other than the one currently selected, mark the ‘Map to’ checkbox and choose the ROI to put the new voxels in from the drop-down menu to the right  .
.
To perform the erosion or dilation, click the Checkmark button.
Undo/Redo Functionality
To undo/redo operations performed in the 3D ROI operator go to the View tab on VivoQuant’s main menu and click the Undo or Redo button. The operation to be undone or redone will be described in the drop-down menu.Keyboard shortcuts are also available for undoing or redoing an operation.
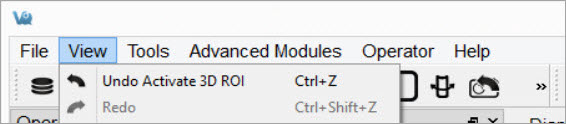
The undo/redo functionalities are applicable to all functions performed on 3D ROI data itself. Operations performed to actual volume image data cannot be undone or redone. For example, performing a cut on an image using an ROI cannot be undone since it is applied to actual volume data and not just 3D ROI data.